Showing posts with label Cricut Maker. Show all posts

Tuesday, August 18, 2020

My Envelope Pouch.

I watched a couple of videos on on how to make these Envelope Pouches.  Joie di fi first made one and then Shabbydabbydoodah also made one.  While I was watching  these I though about an Amazon package that I had and wondered if I could use it to create the Envelope and adhere paper to the packaging so here is the result of what I came up with.

Here is the packaging and the sheet of paper that I created with my Etsy digital papers and Friday Freebies from some of the Junk journal Facebook groups that  I belong to.
I will link them below.
I must tell you that I have always sworn that I would never sew on my paper or in my journal. So I did have to eat my words but that is okay because I have been having so much fun doing it.  LOL!


I glued the paper to the Amazon packaging with Beacon 3-in-1.  I added a ribbon pull that matched the paper.  I sewed around all the edges and and across the front.


I covered the inside with a dictionary paper from My Porch Prints from Etsy


I added some lace and a Print then Cut Butterfly with my Cricut Maker/  The Wonder clips are just there to hold the flap closed for now.


I added some of the lace to the back too!  You can see to the right that lace was white.  I colored it with Tim Holtz Distress Spray Stain.


The photo don't really do this justice.  I colors and the feel of it really make it special.

Facebook groups


Thank you for stopping by.

Monday, August 17, 2020

I just wanted to share this sale before it goes away

Related Posts Plugin for WordPress, Blogger...I don't want you to miss out on this great sale so take a look and see if there is anything you can't live without.  LOL  Well that is how I am with Cricut.  Here is my affiliate Link so click here and take a look


Saturday, August 15, 2020

What's Going On In Your Craftroom?

Related Posts Plugin for WordPress, Blogger...Well here is what I am doing in my Craftroom today.  I am cutting out lots of ephemera that I can store in my Ephemera File Folder that I made last week.  I am really liking it and it is so easy to put together and use.  My Cricut Maker Affiliate Link makes it even easier to make my ephemera with the Print then Cut feature.  Here are some roses that I uploaded and am cutting out in lots of different sizes for different projects. 
Don't forget that I do a Facebook Go-Live every day at 11:45am PST on My Page

Who couldn't use a beautiful Pink Rose.
You can see the registration marks around the perimeter of the Roses.  This is used by the Cricut to know where each rose is and where it needs to cut.
 

I leave the bleed feature on so that it will put a little extra ink around each image and that way I don't get any white or Sticker like White around my images.


This is my Ephemera File folder storage and I just love it.  I made a Video on how to make this, you can see it here  Pt 1 and Pt 2 They are really easy to make and you can see everything that you have without having to dig around in a pile.


Here is just one of the pages and how I am using them..


Thinking about getting a Cricut Maker or Explore you can check out my Affiliate Link here
Thanks for stopping by,  let me know if you have any questions.

Friday, August 14, 2020

Did you know that I do a daily Go-Live 11:45 am PST about using your Cricut?

Related Posts Plugin for WordPress, Blogger...I am not sure if I have posted it here or not but I wanted to let you know.  That since March 27 I have been doing a daily Facebook Go-Live at 11:45 am PST on how to use your Cricut.
Here is the Link to my FB Page
We work on making ready made projects, learning how to use new Cricut tools.  Changing blades, housings, using Cricut Pens, 
I have shown how to use the Print then Cut feature several times now.
I try to show you the mistakes I have made so that you don't have to make the same mistakes or if you do you will know how to fix it.
This week we have uploaded an SVG that I bought on Etsy and we cut it out of vinyl.  I used an Amazon package for my cover and adhered my paper down with Range Multi Medium Matte and then I brushed on Stainz by Patty Pockets

This is the Butterfly that I bought from WildPilotLLC and I love it.  I cut it out of Cricut removable vinyl. I placed the butterfly on the paper that I coated with the Multi Medium and the Stainz by Patty Pockets.  I just love how this is coming together.


Here is the packaging that I am using.


I will have to cut off some of the top and some on the bottom to be Journal sized for me.  I love to do lots of writing so I like my journals to be as large as I can get but still fit into my purse or my bag.  This will be the front.  The paper is a digital download from My Porch Prints on Etsy.


This will be the back.  The paper is a digital download from Jen of Eve Designs.  It is page 27 of her Shades of Color on Etsy.


I am going to make side pockets on each side of the cover.


Here is the inside, I used more digital paper from My Porch Prints on Etsy.


After cutting off the top and bottom I realized that i would have to put some kind of binding on it to make it look right.  I decided to cut strips off like seam binding and I held it in place with wonder clips. Then I would sew it on.

These Beautiful Butterflies are Print then Cut from Anna Griffiths Vintage Butterflies Image Set.  I love how these came out.  Stop by my Facebook page to see how it all comes together.


Etsy Links:
Amazon
Wonder Clips

If you have any questions please let me know.

Friday, May 29, 2020

Champagne Cricut Maker on sale now

Related Posts Plugin for WordPress, Blogger...Click on my affiliate link and get your Champagne Cricut Maker if you are an Access Member for only $299.99 so don't miss out


Wednesday, September 25, 2019

Slicing and Welding with your Cricut

Here is a video showing you how to use the Slice and Weld feature on Cricut Design Space.  I get asked how to slice and weld all the time.  My friend sent me a link to her project because she was having trouble figuring out how to slice.

I show you exactly what I did to help her out.  Now she has this video to refer back to.  LOL!  Its a 2 for 1 special.  That you can use too!.  Save it to your favorites so you have it too.

 
Hope this helps you too.

Thank you for stopping by and don't forget to Like, Subscribe and Share this video with someone you think might like it.


Related Posts Plugin for WordPress, Blogger...

Wednesday, September 11, 2019

Cricut Academy Classes 101 and 102

Just wanted to let you know that I still have a couple of seats left in both my 101 and 102 Cricut Academy Classes at Its All About The Scrapbook Sept 13th and 14th in Dixon, California.  Go to their calendar page and click on the classes that you are interested in.  See the website for times available!


These classes are just for the Explore family and the Maker only!  It is not a computer class so you must come with Cricut Design Space already installed and ready.


Cricut Academy 101 is the Get your Cricut out of the Box and get your machine set up. we will cover everything that you see on the landing and Canvas page.


Cricut Academy 102 will cover everything on the Layers panel.  You will learn how to slice, attach and weld, plus so much more.


On Sunday I am teaching a class on how to use the WeR memory keepers Foil Quill heat pens.


On Sunday I am also teaching a Cricut Vinyl and Easy Press Class.  I will cover all the different types of vinyl and there application including how to use the Iron-On or HTV vinyl.
In this class you get some hands on with how to us the Cricut Easy Press too!

Go to their website and sign up if you are interested in hands on learning with your Cricut.


Hope to see you there.  You can contact the store with any questions that you might have.


Related Posts Plugin for WordPress, Blogger...

Sunday, June 9, 2019

Business Sign for my Sister-In-Law

I was asked by my Sister-In-Law Lani to make a sign for her.  She will use it at her Craft Shows.  She makes bags and purses.  I asked her a few questions about how she wanted it to look.  She will be using an EZ-Up at her shows so it couldn't be made out of anything to heavy or to light.  After searching my drift wood pile I decided that I had nothing that would work or was the right size.  We went to dinner at my friend Bert's who has a bigger pile of drift wood and I found the perfect size of wood and it was also light weight.  It ended up being 7"x17"'s Perfect!
Now to design it.  I searched on Cricut Design Space for bag and it came up with some pictures of a lady holding some bags.  I showed them to Lani and she picked out the one she wanted.  Next we needed to pick a font.  I pick out a couple that I thought would work best on the sign and be legible from a distance and she choose the one she liked.
I made a rectangle in DS for the shapes and sized it to the board that I will be using.  After adding all my images and words to fit on the board (rectangle) I cut it out on some contact paper.
I then painted my board black because that is what I wanted the letters to be.  After letting the paint dry I then applied the Contact Paper to the board and made sure it was stuck down good.  Then I painted over the whole thing in black again.  This prevents bleeding.  After that dried I applied a thick coat of White Waverly paint from Walmart over the black

I forgot to take a picture of the 2 coats of black.  But here it is with the vinyl and White paint on top


Here is the finished piece after peeling off the vinyl to reveal the black underneath.  I think it turned out just fine.


Here are just a few of the bags that she is making


#michelesinkitstampit 

Tuesday, April 30, 2019

Wendy Vecchi Make Art STAY-tion

I have a great find that I think you will love.  I think it is going to be one of those must haves for your crafting needs.  It will be like having extra hands to help you out.

It is the Make Art STAY-tion by Wendy Vecchi from Ranger.  I got mine at It's All About The Scrapbook in Dixon, California.  I could hardly believe it when I saw it.  So I had to get it home and do an unboxing video for it.  I also created a stencil that you can use if you have Cricut Access.  It is in the comments of the video.

So here it is

OMG!  I can't believe I kept saying STAY cation.  Guess I really need a vacation.  I actually said it twice.


Well what do you think about it?  I would like to know.  Leave me a comment and let me know what you think.

#michelesinkitstampit, #it'sallaboutthescrapbook, #makeartstay-tion,


Related Posts Plugin for WordPress, Blogger...

Friday, April 19, 2019

Got Screwdriver?

I have been using my Granddaughters Hello Kitty sewing machine since my Spegial quit working.  Hers had no power cord or instructions.  While I was using it a a crop it got jammed up and I needed to take the plate under the presser foot out.  I tried every screwdriver I could find and none would fit in the small area.  I was stuck!  One of the ladies said she would get a small one when she went home that night but that meant that day was a waist.  I decided I needed to find one that was small enough to keep in by tool kit and have it at the ready when I need it.
My husband always goes to Harbor Freight so I told him the next time he goes that I wanted to go too.  I actually love to go there and look for things that I can use in my crafting and they are way cheaper too.
Here is the set that I bought.  It was only $2.99


 Of course you know I could not leave it in that package and I could not put it in my tool kit by itself, because I would never find it when I needed it.  So I fired up my Cricut Easy Press and opened up Design Space and I came up with this design.  I had some leftover muslin bags that were in my stash.  So here it is all Ironed on.


The little set fit perfect in the little bag.  So now it is always together and I can find it easily in my tool kit.


It looks so cute in the bag all tied up.


This was so easy and simple to do.  In total it only took me 15 mins from start to finish.
Here is the cut file if you would like to use it. 
https://design.cricut.com/#/landing/user-project/142702460

#michelesinkitstampit #cricutmadeit #cricutmaker #cricuteasypress

Related Posts Plugin for WordPress, Blogger...

Thursday, April 11, 2019

What Do You Take To Your Crops

I am up at a crop in Dixon with some friends that have been getting together for a long time.  I love getting together and working on projects.  I always have a hard time trying to figure out what to take with me.  Luckily we are in the room next to It's all about the Scrapbook so I can purchase things that I need, but it is still tough to prepare.   Our Crop is from Tuesday through Saturday!
This time my Cricut Academy Classes are at the end of this crop, so that means that I have to bring everything that I need for my classes as well.
My car was all loaded and ready to go.  I didn't want to rush packing and forget something.  I think I brought it all (literally).
I decided to bring some of the projects that I have been wanting to finish up.  8 Shirts that I need to cut out some Iron-On Vinyl for for a family that is going on a cruise.  They wanted everyone to have the same shirts for the photo getting onto the ship.


8 Shirts done 
Next on my to get done list was:
Little Black bags that my Sister-In-Law got a motor-home rally for a great deal.  I used some Anna Griffith patterned Iron-On vinyl that I had and cut out Hers to put on the bags.  I love how they turned out.  I had know idea what I was going to put on them so I was glad that I had stuck the 2 patterned sheets and one of the Gold Glitter sheets in my bag and it was the perfect amount.
Awhile back I had put His and Hers above my towels in our bathroom and I loved how that turned out.  So I decided to use the same hers.  You can see them all cut out and weeded.  I was able to get 4 Hers out of each sheet so I had one left over to use again.

They were nylon and Cricut does not recommend doing Iron-On on it.  So I lowered the heat on my Easy Press to 295° for 15 seconds.  I placed my Teflon sheet inside the bag hoping that would work and it did (Lucky Me).  I did a cool peel

Here they all are.  Plain simple bags into fabulous


Andrea from It's All About the Scrapbook came to my table with 3 packages that were new in the store.  One of them was Felt from Sizzix in pastel colors.  I told her to put them on my tab.  LOL!  I immediately new I wanted to make a wreath with Felt flowers.  So I searched for Wreath in the ready to make projects on Cricut Design Space and customized it.


Related Posts Plugin for WordPress, Blogger...

Sunday, March 10, 2019

3D Alphabet and the Cricut Maker

I just love these 3D Alphabet letters from Lori Whitlock in Cricut Design Space.  I have fun making them and trying different papers for them.
I made the Cabin letters for our Cabin and the Lake letters for my sister-in-law.  They do get easier to put together the more you do them. (like anything else LOL!)  Give them a try.


I sized the letters to be 7.5" tall.  I love how they turned out.


Related Posts Plugin for WordPress, Blogger...

Friday, January 25, 2019

Fishing Sign/ Birthday Gift

Last weekend was my Brother-In-Law's Birthday.  I had been racking my brain as to what I could do for him.  Then in the morning of his Birthday dinner it came to me.  I am not sure why I cannot come of with ideas until the last possible moment, but that is how it is for me.

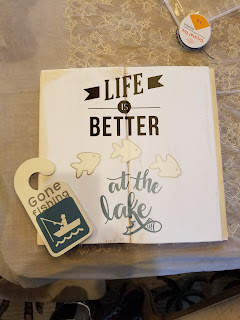
He loves to fish so I decided to make him a sign.  I found a design in the images from Cricut Design Space and thought I could start with that.  While I was designing and tweaking what I was making another idea hit me.  We were at our cabin, so while I have quite a bit of stuff to work with I don't always have what I need.  I didn't have the right kind of wood for the sign to begin with but we were going to Walmart and I thought I would get a piece of shelving about 8" wide and 24" long.  I could cut it into 2.  The shelving at Walmart was not what I was looking for so we stopped at Mendo Mills.  I asked the guy out in the lumber yard if they had any junk wood I could have.  The guy was great and not only found what I wanted but he cut it the size I wanted and gave it to me for free.  Score!

I glued the pieces together, painted it and I had my husband sand all the rough edges.  I also had him add a couple of screws to where I had glued it so it would hold.

While he was doing that I finished up my design and started cutting out my design after I took out what I didn't like and added things I wanted.  Yes it is finally coming together!  Half way through another idea hit me.  To go along with the sign I would make him a door hanger that says "gone fishing".  I had a couple of cereal boxes that  I cut the door hanger out of and glued the 2 together to make it stronger. 

I always tape down my thicker material so it doesn't move.


I cut the first one and the flipped the second one thinking the cereal box design would be in the middle.  WRONG!  It ended up on the outside.  Oh well no time to change it now.  The vinyl will adhere the shinny side.  That what happens when it is last minute!!!!


Next I cut out my vinyl,  after adhering the vinyl I realized I need to cover the back side too!  So I had to cut the vinyl again.


 After I adhered I cut out the first part of the design.  Then I cut the Gone Fishing in Silver.  You can see that in the bottom photo.


Here it is all completed!  I had a whole 5 minutes to spare before we had to leave for dinner!  Made It!  I kind of like how it turned out too!


Maybe one day I can make something ahead of time!  What do you think?

Related Posts Plugin for WordPress, Blogger...