Showing posts with label Signs. Show all posts

Sunday, June 9, 2019

Business Sign for my Sister-In-Law

I was asked by my Sister-In-Law Lani to make a sign for her.  She will use it at her Craft Shows.  She makes bags and purses.  I asked her a few questions about how she wanted it to look.  She will be using an EZ-Up at her shows so it couldn't be made out of anything to heavy or to light.  After searching my drift wood pile I decided that I had nothing that would work or was the right size.  We went to dinner at my friend Bert's who has a bigger pile of drift wood and I found the perfect size of wood and it was also light weight.  It ended up being 7"x17"'s Perfect!
Now to design it.  I searched on Cricut Design Space for bag and it came up with some pictures of a lady holding some bags.  I showed them to Lani and she picked out the one she wanted.  Next we needed to pick a font.  I pick out a couple that I thought would work best on the sign and be legible from a distance and she choose the one she liked.
I made a rectangle in DS for the shapes and sized it to the board that I will be using.  After adding all my images and words to fit on the board (rectangle) I cut it out on some contact paper.
I then painted my board black because that is what I wanted the letters to be.  After letting the paint dry I then applied the Contact Paper to the board and made sure it was stuck down good.  Then I painted over the whole thing in black again.  This prevents bleeding.  After that dried I applied a thick coat of White Waverly paint from Walmart over the black

I forgot to take a picture of the 2 coats of black.  But here it is with the vinyl and White paint on top


Here is the finished piece after peeling off the vinyl to reveal the black underneath.  I think it turned out just fine.


Here are just a few of the bags that she is making


#michelesinkitstampit 

Friday, January 25, 2019

Fishing Sign/ Birthday Gift

Last weekend was my Brother-In-Law's Birthday.  I had been racking my brain as to what I could do for him.  Then in the morning of his Birthday dinner it came to me.  I am not sure why I cannot come of with ideas until the last possible moment, but that is how it is for me.

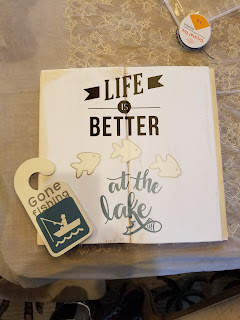
He loves to fish so I decided to make him a sign.  I found a design in the images from Cricut Design Space and thought I could start with that.  While I was designing and tweaking what I was making another idea hit me.  We were at our cabin, so while I have quite a bit of stuff to work with I don't always have what I need.  I didn't have the right kind of wood for the sign to begin with but we were going to Walmart and I thought I would get a piece of shelving about 8" wide and 24" long.  I could cut it into 2.  The shelving at Walmart was not what I was looking for so we stopped at Mendo Mills.  I asked the guy out in the lumber yard if they had any junk wood I could have.  The guy was great and not only found what I wanted but he cut it the size I wanted and gave it to me for free.  Score!

I glued the pieces together, painted it and I had my husband sand all the rough edges.  I also had him add a couple of screws to where I had glued it so it would hold.

While he was doing that I finished up my design and started cutting out my design after I took out what I didn't like and added things I wanted.  Yes it is finally coming together!  Half way through another idea hit me.  To go along with the sign I would make him a door hanger that says "gone fishing".  I had a couple of cereal boxes that  I cut the door hanger out of and glued the 2 together to make it stronger. 

I always tape down my thicker material so it doesn't move.


I cut the first one and the flipped the second one thinking the cereal box design would be in the middle.  WRONG!  It ended up on the outside.  Oh well no time to change it now.  The vinyl will adhere the shinny side.  That what happens when it is last minute!!!!


Next I cut out my vinyl,  after adhering the vinyl I realized I need to cover the back side too!  So I had to cut the vinyl again.


 After I adhered I cut out the first part of the design.  Then I cut the Gone Fishing in Silver.  You can see that in the bottom photo.


Here it is all completed!  I had a whole 5 minutes to spare before we had to leave for dinner!  Made It!  I kind of like how it turned out too!


Maybe one day I can make something ahead of time!  What do you think?

Related Posts Plugin for WordPress, Blogger...

Friday, May 12, 2017

May Kard Club Swap

We had our May Kard Club Swap last night at my house.  It took me most of the week to get my room ready.  What a mess it was.  It is always nice to go through things and purge what you really don't need.  If you don't absolutely love it, get rid of it.  So that is exactly what I did.  Woo Hoo!

Our theme was Red, White, and Blue.  Some will even make a little goody for each of us!  Laurie made an Uncle Sam hat that holds lots of yummy candies.  Laurie loves her Silhouette so I am sure that she used it to cut this cutie out.


First up is Kathy M. I love the googly eyes.  LOL!


This one is Erin's


Donna made this one


Here is Jeannine's


Debbie used flowers and a cute saying inside


Inside of Debb's


This one is mine, I used watercolors for the background and then stamped the fire works in cranberry. I made 2 different color backgrounds to look like the sunset and the night sky.  I water-colored on regular Daisy White cardstock (it's not watercolor paper). The little boy in the pedal car is a Cricut cut from A Child's Year.  It is probably my favorite cut of all.  I used Mercury Glass stickles  on the starts and Wink of Stella Clear on the bell.  The little boy in the pedal car was actually cut out in Daisy White cardstock and sponged with Sapphire ink only because I used all my Sapphire cardsock on a Mini Album and have not yet replaced it.  I popped him up with foam tape.


Here is Jodie's she lives in Nevada so we think she made it to look like her state!


On the inside


This one is Laurie's I am sure she cut this with the Silhouette.


It's even cute on the inside.


Last but not least is Cathy's.  We all know this shape!


Inside


And now for our project.  I cut 6 blocks of 2x4 wood 11" long.  Well my husband did and sanded them all down.  Not quite smooth.  I painted them on all 4 sides with White acrylic paint.  You can use whatever color you want.  This will be the actual color of your letters.   Then I cut out the word Kitchen in 4 different fonts so they would have a choice.  I weeded all of them but one just so they could see how I do it.
I use contact paper for these kinds of projects.  It is way cheaper than vinyl and since I peal it off of my project I don't feel like I am wasting as much money.


This is after I weed every thing off.


I then place painters tape over it.  Leaving a tag to hold onto on each end.


Then I lift up the tape from one side and the vinyl will come off with it.


Next I hold onto the tags at each end and center it on my block and burnish the letters down with my bone folder.


The last step is to peal off the painters tape leaving the vinyl.  Sometimes you have to use your fingernail to hold the edge of the vinyl down while pealing the tape up.  Then burnish the letters to the block


 Now you are ready to paint your block.


The step I am missing is to first dab white or what ever color you painted you block.  This will seal around the vinyl so that no paint will bleed under the vinyl.  Very Important Step.  
After that dries completely then you can paint over the whole block.  I used black but you can use any color that goes with your Kitchen.  You will need to let that dry completely.


Then I take my Kraft knife and peal up the letters carefully.  That's it!  You can seal it with a clear sealer.


Here are all the ladies with their signs.  You can use your re-inkers to mix with the White paint to make it any color you want.  Cathy, Erin, and Jeannine used Sea Glass.  It is hard to see in the picture but they turned out great!


I got a text later in the evening and Jeannine shared hers in her kitchen.  How cute is that.


Hope you give this a try please share you pictures in the comments.  Let me know if you have any questions and I will be happy to help you.


Related Posts Plugin for WordPress, Blogger...