Last weekend was my Brother-In-Law's Birthday. I had been racking my brain as to what I could do for him. Then in the morning of his Birthday dinner it came to me. I am not sure why I cannot come of with ideas until the last possible moment, but that is how it is for me.
He loves to fish so I decided to make him a sign. I found a design in the images from Cricut Design Space and thought I could start with that. While I was designing and tweaking what I was making another idea hit me. We were at our cabin, so while I have quite a bit of stuff to work with I don't always have what I need. I didn't have the right kind of wood for the sign to begin with but we were going to Walmart and I thought I would get a piece of shelving about 8" wide and 24" long. I could cut it into 2. The shelving at Walmart was not what I was looking for so we stopped at Mendo Mills. I asked the guy out in the lumber yard if they had any junk wood I could have. The guy was great and not only found what I wanted but he cut it the size I wanted and gave it to me for free. Score!
I glued the pieces together, painted it and I had my husband sand all the rough edges. I also had him add a couple of screws to where I had glued it so it would hold.
While he was doing that I finished up my design and started cutting out my design after I took out what I didn't like and added things I wanted. Yes it is finally coming together! Half way through another idea hit me. To go along with the sign I would make him a door hanger that says "gone fishing". I had a couple of cereal boxes that I cut the door hanger out of and glued the 2 together to make it stronger.
I always tape down my thicker material so it doesn't move.


Next I cut out my vinyl, after adhering the vinyl I realized I need to cover the back side too! So I had to cut the vinyl again.

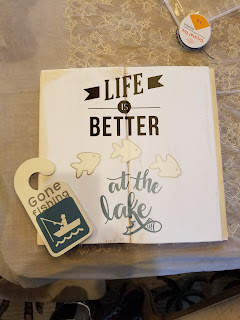
After I adhered I cut out the first part of the design. Then I cut the Gone Fishing in Silver. You can see that in the bottom photo.

Here it is all completed! I had a whole 5 minutes to spare before we had to leave for dinner! Made It! I kind of like how it turned out too!
Maybe one day I can make something ahead of time! What do you think?

He loves to fish so I decided to make him a sign. I found a design in the images from Cricut Design Space and thought I could start with that. While I was designing and tweaking what I was making another idea hit me. We were at our cabin, so while I have quite a bit of stuff to work with I don't always have what I need. I didn't have the right kind of wood for the sign to begin with but we were going to Walmart and I thought I would get a piece of shelving about 8" wide and 24" long. I could cut it into 2. The shelving at Walmart was not what I was looking for so we stopped at Mendo Mills. I asked the guy out in the lumber yard if they had any junk wood I could have. The guy was great and not only found what I wanted but he cut it the size I wanted and gave it to me for free. Score!
I glued the pieces together, painted it and I had my husband sand all the rough edges. I also had him add a couple of screws to where I had glued it so it would hold.
While he was doing that I finished up my design and started cutting out my design after I took out what I didn't like and added things I wanted. Yes it is finally coming together! Half way through another idea hit me. To go along with the sign I would make him a door hanger that says "gone fishing". I had a couple of cereal boxes that I cut the door hanger out of and glued the 2 together to make it stronger.
I always tape down my thicker material so it doesn't move.

I cut the first one and the flipped the second one thinking the cereal box design would be in the middle. WRONG! It ended up on the outside. Oh well no time to change it now. The vinyl will adhere the shinny side. That what happens when it is last minute!!!!

Next I cut out my vinyl, after adhering the vinyl I realized I need to cover the back side too! So I had to cut the vinyl again.

After I adhered I cut out the first part of the design. Then I cut the Gone Fishing in Silver. You can see that in the bottom photo.

Here it is all completed! I had a whole 5 minutes to spare before we had to leave for dinner! Made It! I kind of like how it turned out too!

Maybe one day I can make something ahead of time! What do you think?